
It's crunch time on our trailer.
But things have gone well and we are set to be finished this week.
Hopefully by tomorrow, if no small catastrophes occur.
Keep your fingers crossed!
The finishing touches to make-her-pretty are time consuming... and expensive.
But we've still spent much less money then what we would have to buy a newer-ish one.
The website I went to for the info on how to do all of this is
(Catchy name eh? Maybe he should have gone with something longer hehe.)
But from now on I will refer to this as "The TCV Guy"
If you are considering restoring a trailer like this check out that link.
He tells you how to do everything and has done some great work.
You could learn all you need to know by browsing his website for a half hour.

I bought a few sheets of aluminum at Lowe's.
C - says that they aren't really aluminum, but some kind of steel.
In my defense it said aluminum on the sticker, but he is probably right.
My man knows his metals.
So whatever metal it is, he took it to work, and cut it out to shape.
Then he secured them on.

He got the fastener at Sears, the actual rivits were cheaper on ebay.
But you can get them at Sears too.
***One thing I forgot was to take pictures of is the massive amounts of Bondo
he used to fill dents and such on the exterior. Bondo is kind of like spackle for metal
(just in case you didn't know.) find it with automotive supplies.
***Another thing I forgot was he sealed all of the metal he put on with paintable caulk.
Lets keep this water tight.
While C was busy with the heavy lifting and labor, I was using my sewing machine.
I sewed for days. I think it was every bit as labor intensive as
installing sheet metal, but that's just my opinion.

I also made curtains, an awning and some other incidentals. But I don't have pictures of them yet.
You will just have to wait.
Then it was time to paint!

SAND
• We sanded it with a heavy-ish sandpaper about 180 I would say.
There were some fine scratches on the aluminum but since we we were using regular
paint we didn't worry about it. If we were using auto body paint sand it with finer sandpaper.
WASH
• After sanding we washed it with TSP which is a heavy duty cleaner and de-greaser.
That stuff is amazing. It cleaned her up so well.
TAPE
TAPE
• Next we taped it off it off. I used some auto body tape for this because it adheres so
well and peels off with out leaving a film. I ran over the tape with a credit card just to be
sure the edges were really smooth. I got the auto body tape in the automotive section at walmart.
RESEARCH YOUR PAINT
Now here is where I disagreed with The TCV Guy.
He recommends using oil-based primer and paint for the exterior, but when I googled
"What kind of paint to use when painting aluminum" 9 out of 10 websites said to go with latex.
They said that latex is more flexible then oil based. Oil based paint will dry hard and crack which is not-so-good on flexible aluminum, it also does not withstand changes in temperature as well.
So we went with latex.
• I went to Lowe's and talked to the paint guy.
He agreed with me that Latex paint would be best and referred me to some paint and primer.
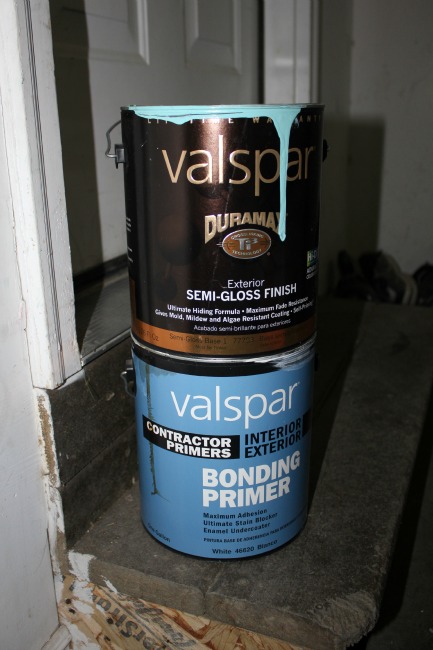
Primer - Valspar interoir/exterior bonding primer
Paint - 1 gallon of Valspar duramax semi-gloss exterior paint in aqua and one in white.
They color matched the aqua paint for me and they also toned down the brightness
of the white paint for me a little. It was perfect I love it.
Below is a picture of the kind of paint an primer we used.
PAINT
• I got my paint sprayer all set up to prime the trailer and.... DOH! It was broken. Since
I didn't want to shell out more money to buy a new paint sprayer we decided just to roll the paint on.
• We used a foam roller that is made for painting cabinets.
• We rolled the primer on first and then let it sit for 3 days to cure. That was hard for me,
I wanted to move on to painting, but you are supposed to let the primer cure.
• Then we painted! YAY! The paint went on pretty smooth, it was really hot outside though
(around 100 degrees) so the paint dried super fast. I don't think the paint dried as smooth as
it normally does just because it was so hot. In less the 5 minutes it was dry to the touch. The aqua
paint covered perfectly but with the white paint you can see roller lines when it's in just the right light. I think this is because it dried so fast, I have used that same paint since and there were no roller lines.

***Update***
It has been a few years now and the paint is still awesome. No chips or cracks. I love it!
Now we need to finish putting it back together and add some finishing touches.

The drip trim is also called "J trim" and it acts essentially as a rain gutter for the camper.
Our old drip trim was banged up and well...... ugly.
So we splurged on new and I'm glad we did.
C - repacked the bearings and made sure the trailer breaks work.
Right now he is loading up the old tires in the truck to take to the tire shop to get new tires.
I hope they have white walls ;-)
**Update: They didn't have white walls that would fit :-(
Most of the things we needed to do this restoration we found at Lowe's.
The things we couldn't find there we found at a camper repair shop.
The one thing that the camper repair shop did not have I found at this website
And they have just about everything I could need.
Resources
How to instructions - The Complete Vintage Travel Trailer Restoration Website.
Supplies - Lowe's and our local Camper Repair Shop
More supplies - Vintage Trailer Supply
This has been a lot of work. I knew it would be a lot of work
but I didn't think it would be THIS MUCH work.
Would I do it again?
Yes.
But I'm not sure if the hubs would say "yes" too.
And I'm not going to ask him. hehe ***UPDATE*** Whenever we drive past an old trailer he asks me "Do you think we should make them an offer?"
I'll just take him camping and make him some good food and I'm sure he will feel better about it soon.
Thanks!

16 comments:
Your camper is just turning out to be the cutest thing!!! Ya'll have done so well restoring and your hard work shows!
Part 4 please! Would love to see the final outcome, show that baby off!
Oops, part 5!
Haha! Thanks for being excited ;-)
I can't wait to show her off too.
It's too bad you don't live close by, all of my neighbors have been coming over to see.
Brakes not breaks... Good job on the restoration!
WOW! What fun. AMazing job and soooooo ambitious. I am so happy to have found your blog. I just bought a camper that is wonderful, but not really what I wanted. I wanted a vintage, but could not afford one at this time. So, I have a small one that I am going to paint (turquoise) and do the best I can to repair and make it look as old as I can. Thanks so much for your wonderful restoration tips. I am going to use many of them.
i'm so excited!!!
teri
Could you tell me more about the drip trim/"J trim" that you used? Did you get it at lowes? Was it difficult to work with. Are there different sizes? Thank you so much!!!!!
Meghan
can you update me on how the paint is holding up. We are getting ready to paint our 1962 Winne and I just bought Exterior Latex really hoping it works.
I really like the transformation! The color-combination is beautiful and attractive! Anyway, painting can be one of the most difficult part of the restoration process. You have to make sure that the paint has dried perfectly, so that it won’t get “gummy” later on. And I guess you can thank the hot weather for helping you dry the paint that much faster. Good job!
Cristina Hamilton @ Mount Comfort RV
Thank you so, so much for sharing this process of restoring Rosie. She is beautiful! We are currently restoring our 1962 Shasta and I love your choice in exterior colors. It's also a huge help, that you shared the info about latex vs enamel and the update on how she has held up. Would you mind telling me what color the blue is? I wish you many safe and sweet adventure with your family!
You just thrilled me up, Buttercup. I just told my husband I feel the Valspar Duramax exterior with primer could do the job we needed as well as the rustoleum marine based 'stinky' paint and did a small patch test. It dries so smoothly I was delighted, because I know it's extremely durable. But to see your update and hear no cracks or changes after 4 years!!!! THANK YOU!!! Thrilled to the gills! We will be wrapping up the project with our little '73 Shasta soon. It was perfect for us since we met in '73. Thanks for your help, from another happy camper
Roxy
Your blog is one of my favorite. Thank you for sharing the restoration process. It is one of the most helpful out there. I thought you might like to know that even after all this time people still appreciate all of your helpful lessons. One question, please. How did you create the silver stripes on the exterior?
This is a blog to watch for sure. I think you have a really awesome writing style by the way. Very easy to read. Your blog design is so clean too! Thank you all the hard work!
vehicle Scratches Removal
I was reading your article and wondered if you had considered creating an ebook on this subject. Your writing would sell it fast. You have a lot of writing talent. a best RV dealer in Kansas
Hello I don’t mean to both you but I have a question....we just got a camper that looks identical
To your interior..my question is did you keep the ice box? And if not what did you replace it with....
You're funny. And so smart. Here's the thing, though: the Link to "The Complete Vintage Travel Trailer Restoration Website" goes to a 404 error page.
Help with the live link? Thanks!
Post a Comment